The Clever Cactus planner groups all My Weeks together so you can just keep flipping the pages all year long.
Here it is, my third (and probably final) official guide. We’ve looked at My Year and My Months. All that’s left is My Weeks and My Notes, which I’m grouping together here since they’re both pretty short in comparison to the first two sections. If the My Years is the base, My Months the first floor, then My Weeks is the second floor, I guess, where you live. Maybe?
This analogy went off the rails somewhere and it’s too late to fix it.
The point is, that each section in the Clever Cactus planner gets more focussed. You go from general big steps to small individual tasks. This, in my opinion, is the key to continual forward movement when it comes to achieving your goals. Getting yourself to the point where your daily focus is what you Must Do that day, and not what’s coming down the line a month from now. All while still keeping tabs on the overall goal.
The My Weeks Guide
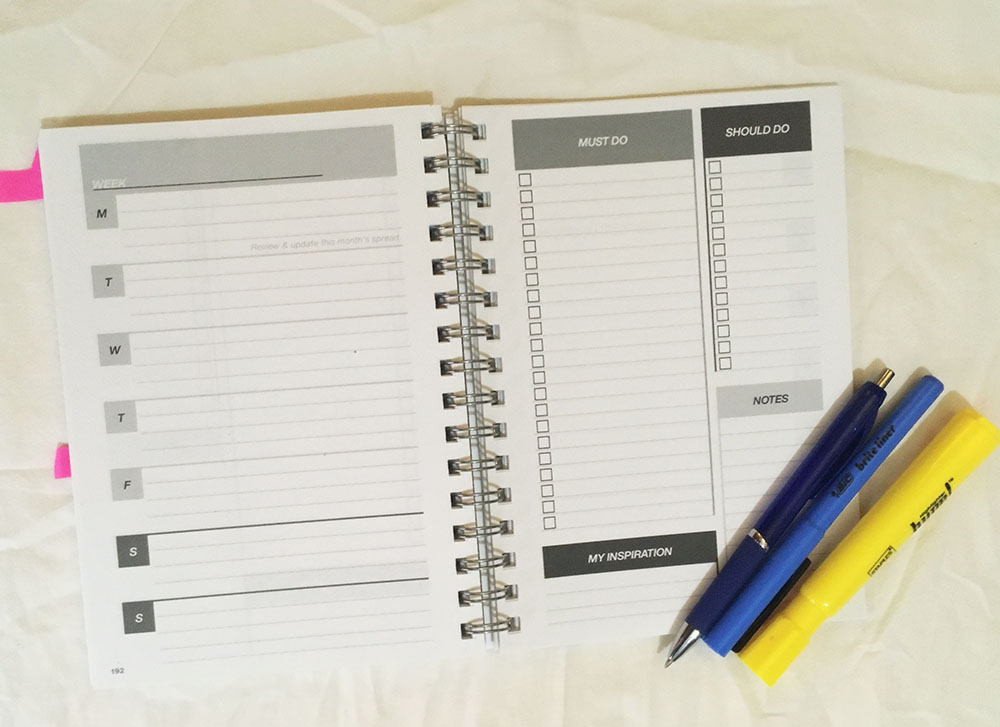
The Clever Cactus planner has 53 week spreads, so you can start managing your week whenever you pick it up, even if it’s in the middle of a month. Each My Weeks spread has a space for your weekly agenda, must-do tasks, should-do tasks, notes and inspiration.
I do a Monday review every – surprise surprise – Monday, at the start of my work week. During this review, I fill out each section of my week’s spread and check in on the current month in My Months section. I highly suggest filling in everything as much as possible at the beginning of the week, so that you can focus on doing the tasks, instead of organizing your life, throughout the week.
Weekly Agenda
This is, you guessed it, a calendar agenda style page. I use this page to make note of my appointments, project due dates, birthdays and any other important events or dates.
Here’s how I complete the page:
- Write the week at the top of the page – I usually do the date spread,
ex. December 21st to 27th. - Add the day’s numerical dates in the white space under the day’s initial.
- Flip to the appropriate spread in My Month’s section & look through the Cover, Money, Tracking and To Do List pages for that month.
- Add any important tasks, due dates, appointments and major happenings to my weekly agenda page.
I also use the agenda to track my habits, then update my Tracking (monthly) page once a week during my weekly review. This is more because I’m a bit lazy and didn’t want to flip through the book every day…
If you’d like to use this method, here’s what you do:
- Write the day’s numerical dates in the shaded area ABOVE the day’s initial
- Daily Habits: When you complete a daily habit, make a note in the white space under the day’s initial. I like to use the habit’s first letter. For example, I’m trying to write every day, so when I do write, I put a W under the day’s initial.
- Hourly Tracking: when you’re setting up the weekly agenda, write your hourly tracking points each line. For me, I write “Sleep:” on the first line. Then, that night, when I go to bed, I write down the time. When I wake up the next morning, I write down the time again. I might end up with something that looks like this:
Sleep: 2:30am – 10am
(I’m a night owl … That’s not even an accurate example of how late I go to bed!) - Keep track of everything throughout the week on your agenda page.
- During your weekly review, transfer your tracking data to the Tracking page in your month’s spread.
Must Do & Should Do
As a self-employed, freelance writer, I’ve categorized all my client and business work as “Must Do”. Chores, personal tasks (like call a family member, or do my laundry) go under “Should Do”. Oddly enough, the titles are almost always true. I must do my client work, and I should do my chores. But I don’t have to do my chores.
I really really should.
But I don’t have to.
Anyway!
Onto the quasi-step-by-step guide for these two sections:
- During my Monday Review, I look through all my projects, emails, calendars, etc. and write:
- Under “Must Do”, every work task I need to complete that week.
- Under “Should Do”, every chore or personal task I want to complete that week.
- At the same time as step 1, I flip to the current month’s My Months spread and check for any incomplete, urgent, planned, etc. tasks and add them to the appropriate place on My Weeks spread.
- Throughout the week, I use the boxes to check off the tasks as I go.
- I add the first line of an X when I’ve worked on a task.
- I add the second line of the X when I’ve nearly finished a task and only have one more step (ex. submit to my client).
- I highlight the whole line in yellow when I’ve completed a task in its entirety, including submitting to the client.
- Also throughout the week, if I realize I won’t complete a task, I highlight it in blue. This way I know exactly which tasks I don’t need to think about anymore that week. It also makes it easy to know which tasks to copy over during my Monday Review the following week.
Highlighting the whole line when you’ve completed or postponed a task makes it really easy to see how much work you have left to do throughout the week. I personally love these types of visual indicators and use them liberally throughout my own planner.
You might notice that each Monday in the My Weeks spread has “Review & Update this month’s spread.” I wanted to make sure everyone remembered to check their My Months section each week.
Notes & My Inspiration
You probably know how to use these sections already, so I’ll give just a general statement here instead of a guide. The Notes section is for, you guessed it, any notes you need to make during the week. This could be someone’s phone number, or a note for next week, or a note your past self left you from the week prior. Anything you think you might forget but doesn’t fit in the other sections, jot it down here.
And that leaves My Inspiration.
This little box is for any quotes or thoughts or mantras that inspire you. I like to write something down on Monday to act as my inspiration throughout the week. If I’m having trouble getting motivated, I might put a motivational quote. If there’s only a few more weeks or days until something exciting happens, I might write that down. There’s lots that could inspire us! Use this space to keep your spirits lifted all week long.
The My Notes Guide
The My Notes section is 44 glorious pages of lined paper. I use this section for meeting notes, project notes, ideas, daily journaling … Everything and anything I may decide to write by hand. Sometimes it’s just doodles!
The trick is to add an entry in your index every time you start a new note. Let’s say you’re on page 209, writing a phone message from your bank on March 3rd. When you’re done, flip to page 3 and, in the “My Notes” section of the index, write “Phone Message from Bank, March 3rd” and “209” in the appropriate places. This way you can easily find that message in August, if you need it!
Bringing it all together
It might feel like you need to be looking at every section every day. That’s not the case! The design, and the way I use it anyway, means I can plan and set my goals at the beginning of the year, and I’m done with goal setting. I write out my bills and smaller goals at the beginning of each month, and I have it all there for my reference. I plan out my week at the beginning of each week, and I don’t have to think about what could go on my “Must Do”, because it’s already there.
In fact, to make it a bit more clear, here are two helpful lists!
Here’s how often you should fill in or complete each section of the planner:
- My Year – once a year
- My Months – once a month
- My Weeks – once a week
Here’s how often you should look at/refer to each section of the planner:
- My Year – once a month
- My Months – once a week
- My Weeks – once a day
(My Notes isn’t on either list because that’s more of a “when you need it” section.)
The Clever Cactus Blank Day Planner design makes me, and anyone who uses the planner, move forward step by small step. It takes each of us from planning our Big Grand Goals to completing the smaller, specific tasks that need to be done in order to achieve our goals. It’s Macro to Micro. Story plot to specific scene. Sweeping multi-season TV series arc to a specific episode. Each scene, each episode carries the story or show forward, always working towards that overarching plot or arc. Your daily tasks should do the same, they should always move you towards your goals. And that’s what I designed the Clever Cactus Day Planner to help you do.
This system worked for me. My hope is that it will work for you as well.